How to improuve the Raspberry Pi OS image for a virtual machine
Introduction
Why?
At the introduction of my previous post I discussed some of the issues Raspberry Pi OS (RaspOS) has in regard of being used in a Virtual Machine (VM). The only real advantage of using such a system is the support one can get from the community. If you find a problem, someone, somewhere beyond the sea is there waiting to help you. The same is not true with Ubuntu for instance. A silly question put on a Ubuntu forum will be ignored or answered with a “buy a better equipment” or “use the proper software”. Well, we don’t have and neither wish to have any equipment more expensive than ours Raspberry Pis (RBP) nor can run another thing comfortably on the RBP.
Moreover, a RBP 4 or 5 is more than enough to run anything one may need in a homelab or homeserver. Actually, I managed to run all my stuff on a Lattepanda V1 plus a RBP 3B+. However, the resources one can have from such hardware are limited. Once committed to this kind of equipment, one must be wise on how to spend one’s GiBs and GFLOPS.
In this post I show you how I managed to reduce the minimum space taken by a working image of RaspOS and what services can be safely stopped to reduce the impact of the idle activity of all VMs on the server.
Should you do that as well?
That is completely on you. If you are comfortable spending 4GiB for each VM you create on your system just enjoy it and be happy. For me, as I already said, that is too much of a waist. My first working computer had just 30MiB of hard drive and I managed to run all the stuff I developed for my PhD on a system with 8MiB of RAM and 1GiB of hard drive. Saving computational resources is in my blood.
Things I assume you already know
I hope you have read all my previous posts, starting on this one, on this series and already know all the stuff I mentioned previously. If you got all that, you are good to go
Preparing the tools I needed
Getting more space
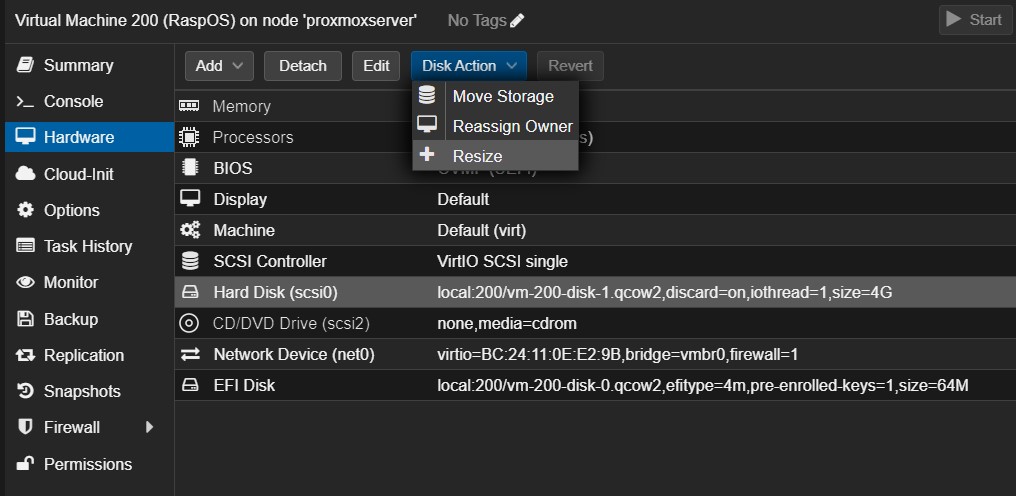
So far, I had two VMs on my Proxmox server, clones of each other, one fully configured, with ID 200, and other stopped at the first boot, with ID 300. For simplicity, I will refer to them as VM200 and VM300. The idea I had was to use VM200 to edit the disk of VM300 in a similar manner I did with the SSD I installed Proxmox. For that, I needed to install GParted, but in order to proper run it I needed a desktop environment. However, to install a desktop environment I needed more space. And here is the main reason I took my time to do all this partition manipulation; increasing the size of a disk in Proxmox is very easy, but reducing it is not. Then I started by selecting the Hardware tab of the VM200, selecting the hard disk and, on the Disk Action menu, I picked Resize.
I clicked on it and the dialog box popped up allowing me to tell how much space I wanted. I increased it by 2GiB, which should be enough.
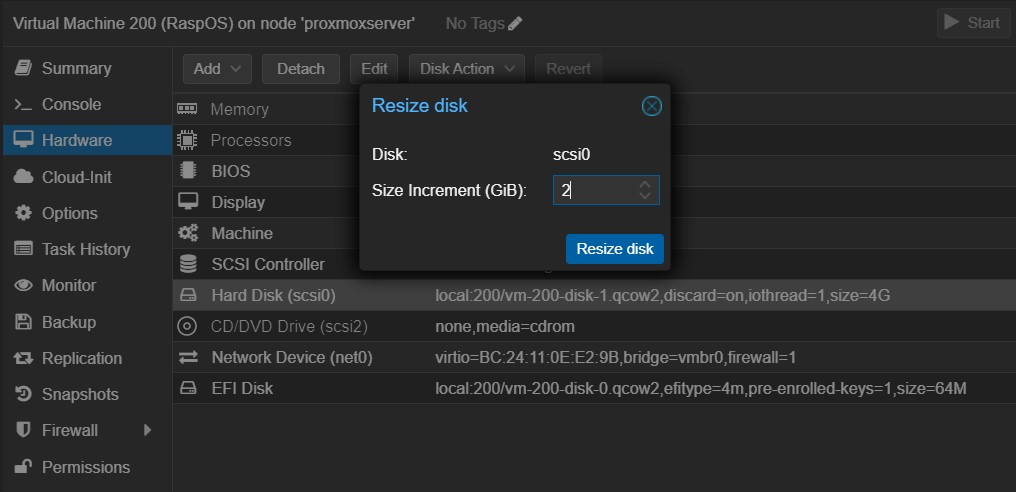
In a few seconds the disk was resized to 6GiB. Then I went to the console and typed:
1
sudo raspi-config
Then I navigated the menu to Advanced Options and Expand Filesystem. Quickly I received a message to reboot the system and so I did. As soon as I got the prompt back I ran the command df -h and there was my extra 2GiB of space.
Installing a desktop
It was ready to start installing stuff, but first I put the system up to date, as it took me a few days to get back to this machine since I left it.
1
sudo apt update && sudo apt -y full-upgrade
And then I gave the command that actually installs the desktop:
1
sudo apt -y install raspberrypi-ui-mods
Once installed, I ran sudo raspi-config again, navigated to System Options > Boot / Auto Login and I chose the Desktop Autologin option. I was prompted to reboot the machine and, about a minute later, I had a Pixel desktop on my Proxmox console for VM200.
![]()
I opened a terminal and gave the command to install GParted, the same from the first post on this series.
1
sudo apt -y install gparted mtools
Reducing the image size
Being safe, not sorry
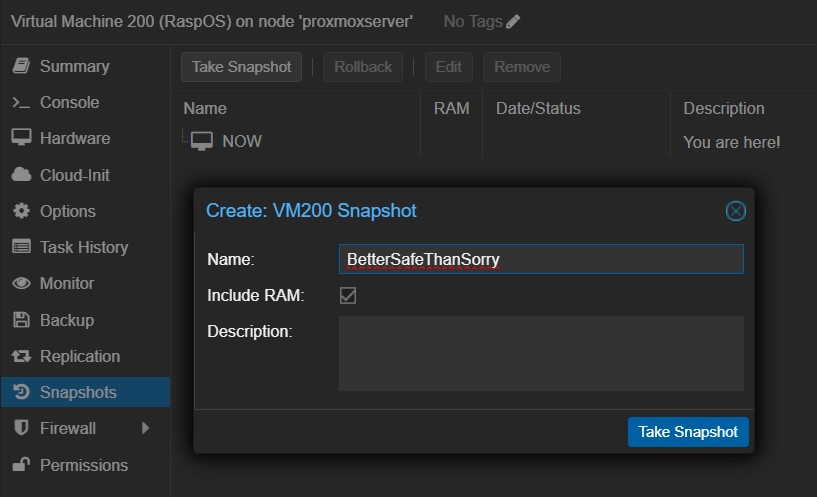
Now was the time to be safe. Before I did anything else, I went to the Snapshot tab and took a snapshot of the current state of VM200. GParted is a powerful and dangerous tool to play with. It is alarmingly easy to mess with the system while using it.
I also cloned VM300 again to have a copy of the hard disk I intended to edit. I could also make a backup of VM300, but cloning was faster.
Moving disk around
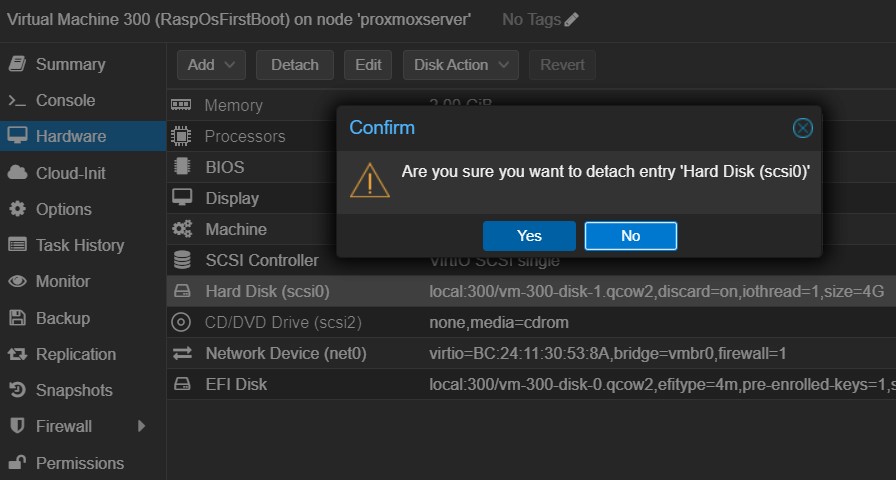
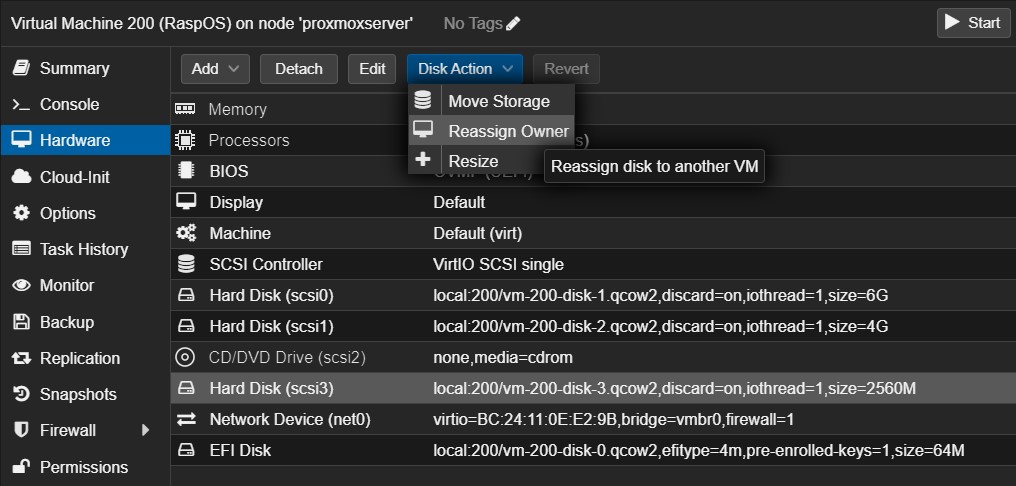
Next I detached the hard drive from VM300 by clicking on the Hardware tab, selecting the drive and clicking on the Detach button.
I then selected the now Unused Disk 0 and on the Disk Action menu I clicked on Reassign Owner.
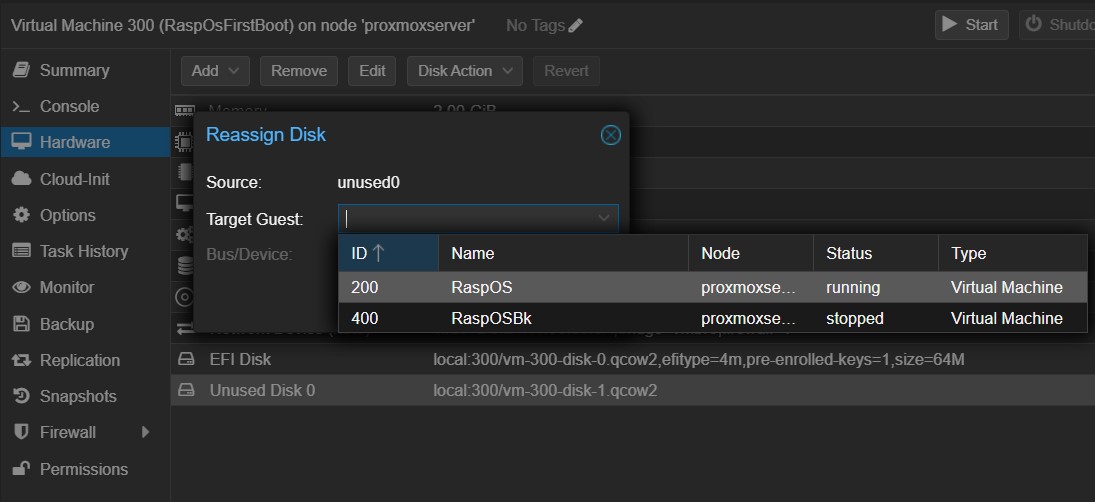
Soon enough the disk was available on VM200 and I checked it with the lsblk command.
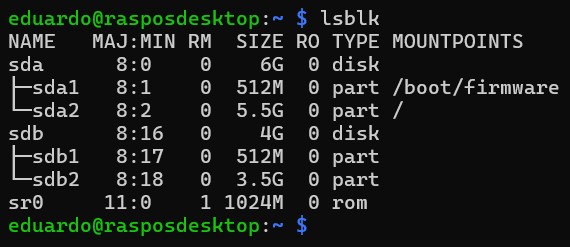
From this point forward I had to be extra careful. As VM200 and VM300 are clones of each other, bolt disks have the same UUID. The sudo blkid command makes it obvious.
If you are following along, let me stress this; pay great attention on which disk you are editing, because I am about to create a third one with exactly the same UUIDs. The only way to differentiate them is by size and mounting points.
I started the manipulation process by mounting VM300’s drive. First, I created a mounting point at /mnt
1
sudo mkdir /mnt/VM300
And then I mounted the rootfs on /mnt/VM300 and the bootfs at /mnt/VM300/boot/firmware it:
1
2
sudo mount /dev/sdb2 /mnt/VM300/
sudo mount /dev/sdb1 /mnt/VM300/boot/firmware/
With the disk properly mounted, I ran the command df -h | grep "/dev/sdb" to check how much space is needed to hold the image. The result showed that from the 4GiB required to install RaspOS more than 1.5GiB are unused. The situation on the bootfs partition was even worse, because despite 30MiB being used, most of it was left over files that are used only to boot RaspOS on the original hardware.

First thing to do is to delete everything from the /boot/firmware/ directory that was not inside the /boot/firmware/EFI/ directory. So, I gave the command:
1
2
3
4
sudo rm -r /mnt/VM300/boot/firmware/overlays/
sudo rm /mnt/VM300/boot/firmware/*
sudo rm /mnt/VM300/boot/overlays
sudo rm /mnt/VM300/boot/issue.txt
After those commands have finished, a new run of df -h | grep "/dev/sdb" showed that only 6.1MiB were effectively used on the bootfs partition.
Creating a new disk
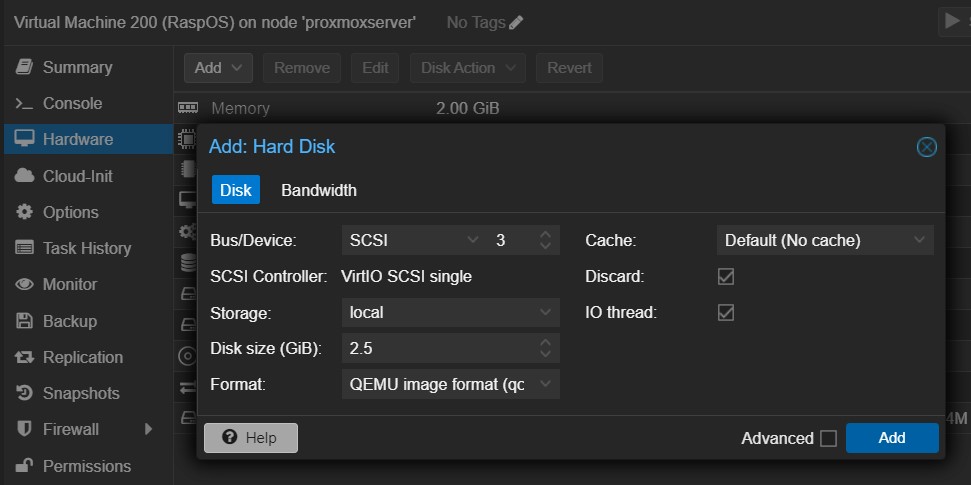
Everything was set to create the new disk to accommodate the system. I started by adding one more hard drive to VM200, by clicking on the Add menu and choosing Hard Disk. I configured it to have 2.5GiB and be stored at the local storage.
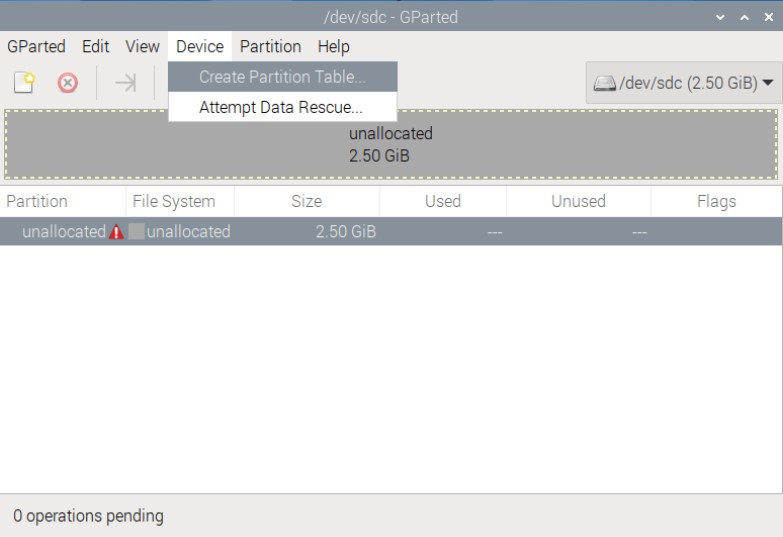
I had then a new disk of 2.5GiB connected at /dev/sdc. It was time to play with fire, I mean, with GParted. I selected the appropriate device and was presented with a completely blank disk. I began by creating a partition table by clicking on the menu Device -> Create Partition Table. I chose the default msdos partition type, as it is the same type of disk from VM300.
Next I right clicked on the unallocated space and chose New on the menu. On the dialog box that opened I set the size to 64MiB, file system to fat32, labeled it bootfs and clicked Add.
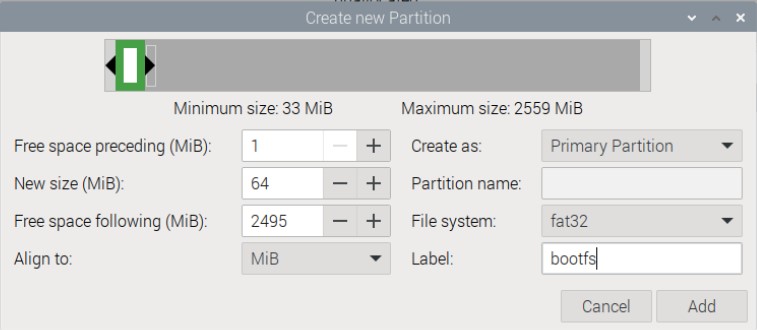
Only 6MiB will be effectively used on the bootfs partition, and if I made it to that size the machine would boot perfectly. However, on updates, Raspberry Pi OS will write new drivers to that partition and if there were not enough space, the update would fail. So, keep it in mind; if for some reason you have a VM that you do not intend to update EVER, you could use a smaller bootfs.
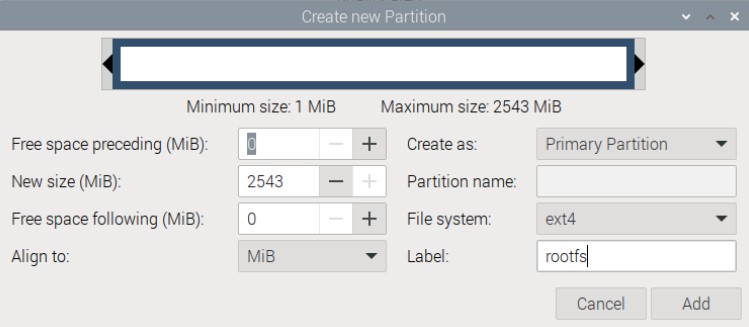
Then I right clicked again on the unallocated space and created the rootfs partition. I kept all the defaults and only changed the label to rootfs.
I applied all changes and that was the end of the nice part. Next I had to deal with the command line to make deeper changes on the new disk. I closed Gparted and went back to the terminal. I had to use the tune2fs and mkdosfs commands to set the UUID of the partitions to match those of the original disk. First I gave the command sudo blkid.
1
sudo blkid | grep "/dev/sdb"
I took note of the UUID of bolt partitions and applied then to the new disk, so /dev/sdc1/ would have the same UUID of /dev/sdb1 and /dev/sdc2/ would have the same UUID of /dev/sdb2.
1
2
sudo tune2fs -U "56f80fa2-e005-4cca-86e6-19da1069914d" /dev/sdc2
sudo mkdosfs -i 91FE7499 -n bootfs /dev/sdc1
Note that for the ext4 partition I kept the hyphens on the UUID and put them inside quotation marks, but for the FAT partition I removed the hyphen and gave the UUID without any delimiter. As mkdosfs destroys all information on the partition, I had to include the partition name again, but this time I used a lowercase name. It gave me a warning about using lowercase labels on FAT file systems, but there is nothing to worry about. This disk is not supposed to see other systems than linux. The last modification needed was to change the PARTUUID. For that I used fdisk.
1
sudo fdisk /dev/sdc
I then typed x to enter the expert mode and i to change the disk identifier. The new disk identifier must be given as an hexadecimal number, so I added 0x to the beginning of it. Note that the last two digits after the hyphen on PARTUUID are just the partition index and not part of the UUID itself, so, if your PARTUUID is a3f161f3-01, you only need to enter 0xa3f161f3. I then typed r to exit expert mode and w to save the changes to the disk.
You may now be wondering it all this could be done on the command line using fdisk, with no need for a desktop environment. The answer is yes. I just installed the desktop to ilustrate how it is done and how to resize a disk in Proxmox. Furthermore, I like using GParted.
Mounting the new disk and putting data on it
I finally arrived at the point of actually copying the system to a smaller disk. First I created a mounting point at /mtn directory called NewDisk.
1
sudo mkdir /mnt/NewDisk/
Then I mounted the rootfs partition to it:
1
sudo mount /dev/sdc2 /mnt/NewDisk/
The bootfs partition must be mounted inside the rootfs partition, at the /boot/firmware directory, so I created it and then mounted the last partition.
1
2
sudo mkdir -p /mnt/NewDisk/boot/firmware/
sudo mount /dev/sdc1 /mnt/NewDisk/boot/firmware/
And, finally, the copying.
1
sudo cp -a /mnt/VM300/* /mnt/NewDisk/
Returning the disk to VM300
Releasing the disks
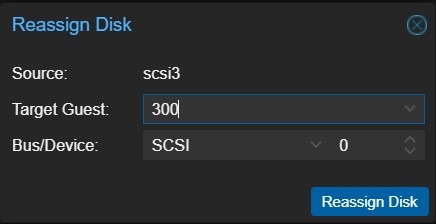
The easiest way to release the new disk from VM200 is to shutdown the VM. This will unmount the volume and allow the detachment and transferring of the disk. Once VM200 was stopped, I selected the disk of 2.5GiB and clicked on Disk Action followed by Reassign Owner.
In the dialog box that appeared I selected VM300 and clicked Reassign Disk.
And before I started VM200 again, I detached the 4GiB disk. As it has the same PARTUUID and UUID as the machine’s disk, the boot process would be messy if I left it there.
Recreating boot configuration
Reconfiguring VM300
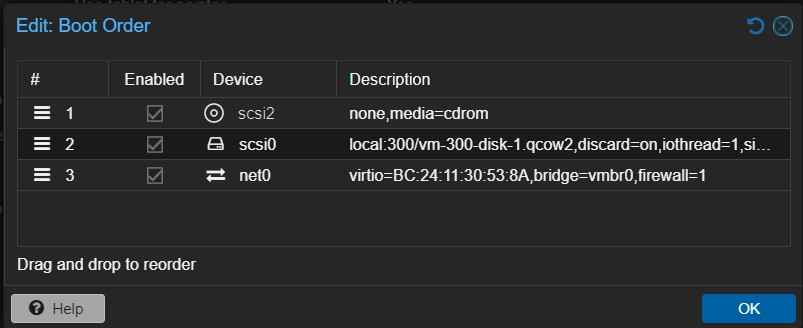
As I had detached the disk from VM300, now that it was back I had to reconfigure some details. First I went to the Options tab and changed the boot order. I put the CD ROM as the first boot option and the disk as the second one, after enabling it, and clicked OK.
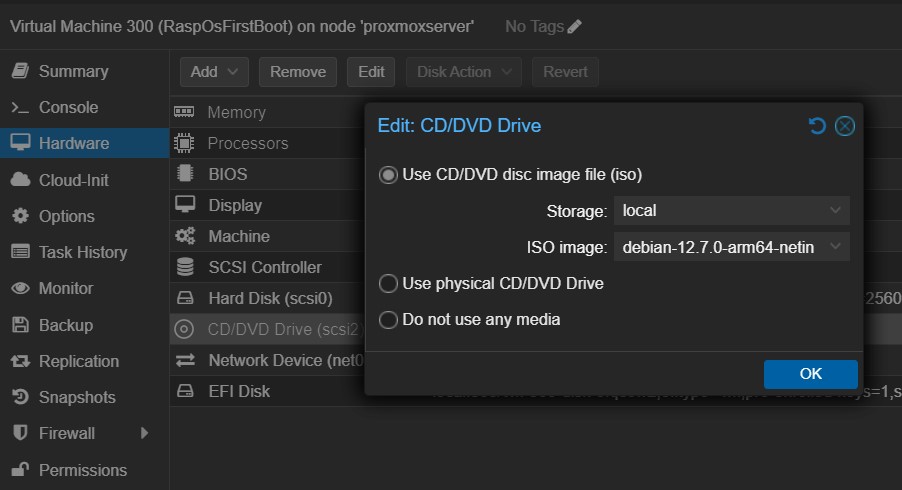
Then I clicked on the Hardware tab, selected the CD/DVD drive and clicked on Edit. I configured the Debian ISO as media and clicked OK.
That done, I started the machine and waited for the menu to appear. From this point onward I practically repeated the process from the last post, but skipping some steps that didn’t need to be redone. On the CD menu I chose Advanced options, Rescue mode, hit enter for all the default values until the menu for choosing the device to use as root file system, for which I picked /dev/sda2/ and on the following screen I chose to Execute a shell in /dev/sda2. On the prompt I then gave the following commands:
1
2
3
4
5
mount -a
touch /boot/firmware/ssh
grub-install --efi-directory=/boot/firmware
update-grub2
exit
I did receive a warning from update-grub2 telling that os-prober will not be executed to detect other bootable partitions. I could safely ignore the warning as I have only one bootable partition and no intention of having a dual boot on a VM any time soon. Then I stopped VM300 and on the Hardware tab I removed the ISO file from the CD ROM.
And that was it. I had then a smaller disk with RaspOS that I could transform into a template or just clone as I needed and resize its disk accordingly if necessary.
In my next post I will tell how I make a 2GiB installation of Debian for my Proxmox server on a Raspberry Pi 4.